The Dolphin 3D software is a powerful tool that makes processing 3D data extremely simple, enabling dental specialists from a wide variety of disciplines to diagnose, plan treatment, document and present cases. Dolphin 3D allows visualization and analysis of craniofacial anatomy from data produced by cone beam computed tomography (CBCT), MRI, medical CT and 3D facial camera systems.
Dolphin 3D software is already widely used by research/teaching institutes and private practices worldwide. It features tools for onscreen manipulation and analysis of volumetric datasets: Images are easily oriented and rotated, and tissue density thresholds can be adjusted for detailed views of craniofacial anatomy. Measurements and digitization can be performed in both 3D and traditional 2D.
Dolphin 3D includes powerful yet intuitive tools for you to process multidimensional datasets. There are no complicated commands or scripting languages to learn. Processing and analyzing three-dimensional data has never been easier.
3D Digital Study Model software works with all intraoral and study model scanners that export to .STL and .OBJ file format, and also seamlessly integrates with CEREC Omnicam and CEREC Ortho Software from Sirona.
Once your study model data is imported, you can:
You prepare the 3D object by grouping intensity levels in pre-set ranges for soft tissue and hard tissue. After this simple procedure, you can easily review the object’s solid or translucent skeletal surface; solid, translucent, or photo of soft tissue surface; or both simultaneously. Views can be combined, such as translucent skeletal structures with translucent soft tissue 3D photo facial texture map.
Dolphin gives you the power to freely visualize the volume in 3D. In addition to switching from hard tissue and soft tissue views, you can also adjust the factor of translucency and intensity to reveal the structure you desire. Color tools help to further clarify anatomy and their spacial relationships.
Clipping tools allow you to quickly visualize hidden structures, or simply eliminate portions of the contents that are not relevant.
Establishing a default orientation is crucial to maximize the consistency of analysis of a 3D volume. Dolphin 3D provides tools for defining the midsagittal, axial and coronal planes. You can orient the volume based on an angle, such as the Frankfort plane. You can also adjust the object’s default yaw, pitch and roll. These operations can be performed on the CT soft tissue surface, CT hard tissue surface or 3D photo surface.
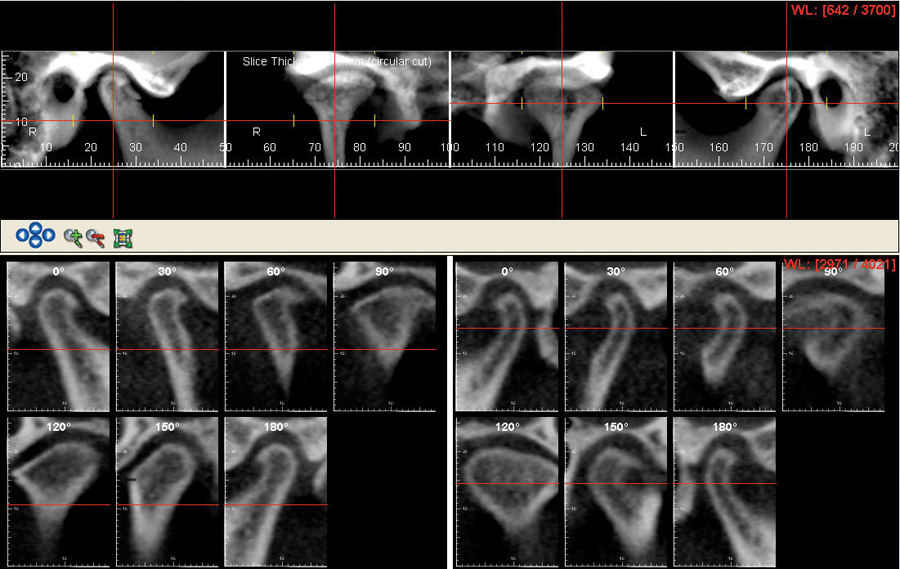
Choose a layout that is best suited to your task:

Easily add implants to a patient’s 3D image for more precise treatment planning and presentation. Place, move, and rotate implants on the volume, slice or panoramic views. Select implant types from a generic implant template library and specify the size. Zoom in and out on an implant; define a “safety zone” around each; segment and sculpt the volume to clip around the implant; measure distances and angles; locate nerve canals; export the final simulation as an iso-surface.

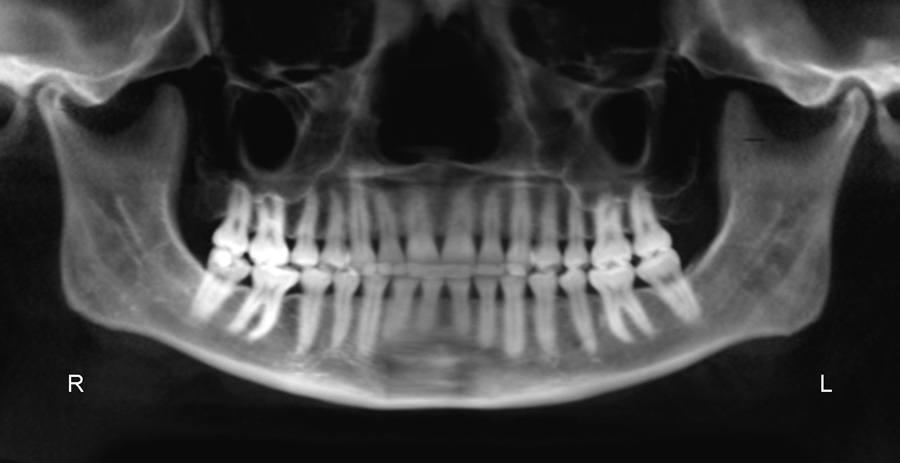
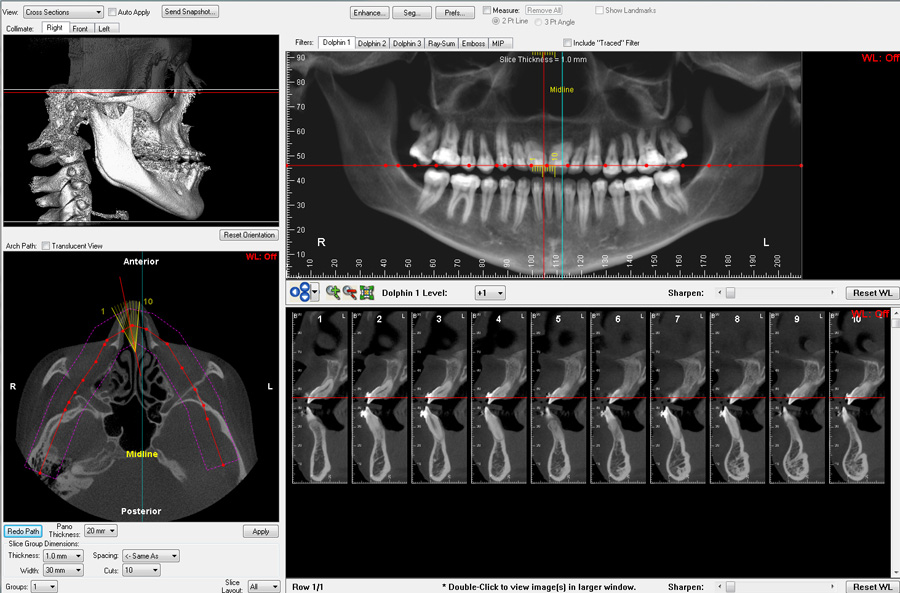
Create two-dimensional radiographic images from 3D volume dataset in the lateral, panoramic (OPG), frontal and SMV views. Reconstruct radiographs in:
Dolphin 3D makes harvesting data from 3D volume simple, and is an excellent tool for research and data collection.
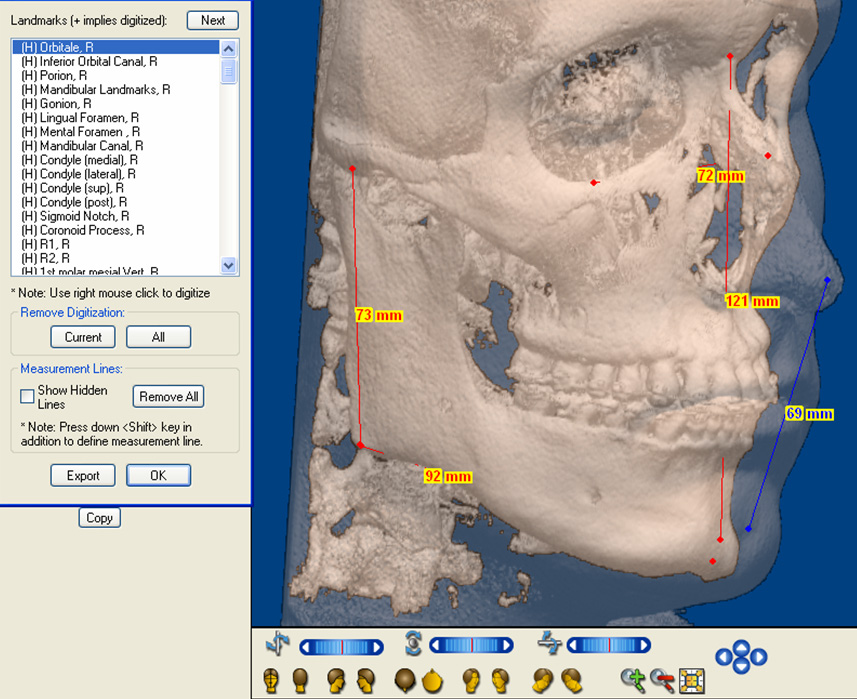
You can measure distances and angles in 3D; design your own analysis in 3D or in 2D (Dolphin Ceph Tracing software required for 2D analysis).
Analyze the airway by drawing a border around your selected portion of the volumetric scan; the program will automatically fill in and display all the airway space within that border, then report back telling you the volume of airway space in cubic millimeters. It will also locate, display and measure, in square millimeters, the most constricted spot of that airway.
Landmarks can be used in a 3D analysis or translated into identified 2D lateral or frontal cephalometric analyses, such as Roth-Jarabak, McNamara, etc. Further, the 2D points can include x-ray magnification to be compatible with existing norm values.
Digitized landmarks can be saved in Dolphin Imaging and exported to a Microsoft Excel spreadsheet or other numerical analysis programs.

New in Dolphin 3D is the Hounsfield Unit Color Mapping tool, which helps you distinguish between different biological structures according to their radiolucency measurements. A graph displays the colors as they fall on the Hounsfield Scale as a reference, while the image on the screen is colored in accordingly.

Superimpose volume scans from different time points to visually track and accurately measure treatment changes in bones and in airways.

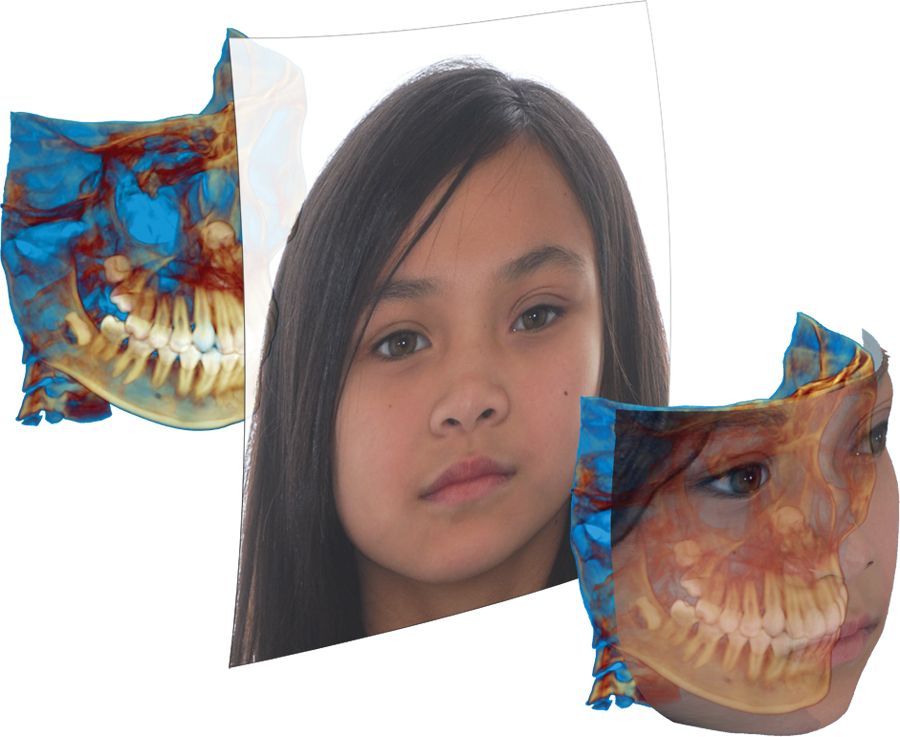
Easily create a texture map on the facial surface of any CBCT, CT or MRI scan. Simply import the 2D frontal photo, and Dolphin 3D guides you through a quick and simple stepby-step process to add the photo to the 3D volume. No additional devices or add-ons are needed to create this wonderful visual identity for any patient’s 3D volume.
Automatically create animated movies by collecting “key frames” from your 3D volume or slice views. By altering the volume’s position, zoom factor, translucency, segmentation, clipping and timing attributes, create a movie script which may be reused for volumes of other patients.
Dolphin 3D then creates a smooth animated movie from your script. Spin, fly-by and seethrough your volumetric object. Distribute movie files, add them to your Microsoft PowerPoint presentation, or play them on your iPod or other portable media player. You control the movie’s speed, resolution, quality and file size with selectable video settings.
You can also export the script’s key frames as individual images. Create a composite set of image layouts of your 3D volume for later viewing or for transfer to referring clinicians.
Create diagnostic reports from your volumetric dataset. You build a workup report specific to a patient’s indication and the specialty of the referral. Build your own library of templates for implant sites, TMJ, impaction studies, tissue pathology, sinus and airway evaluation, and more; a library of existing templates is provided.
The template is easily populated on the fly with desired images and cross sections from the volume. Reports can be exported to a document file or hardcopy printout.
Dolphin Imaging software is an FDA-cleared Class II medical device
"Your 3D Surgery program is great and really easy to use. I was able to fabricate a surgical splint by just watching the webinars."
"3D Surgery is a great promise of a world where the orthognathic patient is entirely virtual in its planning and data transfer to the operating room."
"In 2012, I found myself spending so much time cutting stone models in the lab that I began plans to retire from my practice. Then Dolphin announced 3D Surgery, and I got on board with it immediately. It changed my life and reinvigorated my career. The new frontier of virtual surgery/guided execution is so exciting, that I don’t think I’ll ever retire."
"The Dolphin 3D Surgery module is a complete multidisciplinary treatment planning tool. It lets us instantaneously segment the volume and get step-by-step simulated results of the treatment plan—including real-time soft tissue simulation."
"The holy grail of computer cephalometric planning has always been 3D planning. And now, with 3D Surgery, we are able to treatment plan while visualizing the movements in all three planes of space. State-of-the-art soft tissue morphing is the competitive edge that the Dolphin 3D Surgery module has over all of the competition."
"My patients are more and more asking to pre-visualize their face ‘with’ or ‘without‘ surgery and choose their treatment accordingly. Dolphin 3D Surgery is a wonderful tool of communication between doctor team and patient. It allows the patients to push away the fear of surgery."
"Dolphin 3D Surgery has evolved beyond what I had imagined in the way of user friendliness. We looked at the 3D product by Materialize and it simply does not compare. I am looking forward to what comes down the road as it continues to get buffed up. You are certainly heads and tails above your competition in that regard."
"Dolphin has always been ahead on 2D planning, imaging, and photo integration. Now its 3D Surgery is my # 1 choice for surgery preparation. It is simpler and easier than Simplant O&O.."
"Since my involvement with computed imaging research in the early 1980’s, I have been waiting for user-friendly 3D orthognathic planning software. Thirty years later, now we have it. Dolphin 3D Surgery is user-friendly and builds on the intuitive 2D planning interface."
3D Surgery is a comprehensive case planning and presentation tool that animates the patient’s skeletal and facial changes in real time, and outputs to a precise surgical guide. All you need is a 3D DICOM dataset, virtual models and optional facial photo. Use data from cone beam CT, spiral CT, and other sources. Combine with intraoral scans or electronic models for accurate virtual model surgery. Along with the other wonderful features of Dolphin, this is why Dolphin 3D is used worldwide.
Begin with a quality 3D cone beam or spiral CT image. Then, simply follow the step-by-step Segmentation Wizard to create the proper virtual surgery patient. If you utilize a 3D facial camera, Dolphin can process it; if not, Dolphin 3D Surgery can take full advantage of your clinical (2D) photographs.
The heart of Dolphin’s 3D Surgery module is a very powerful and comprehensive surgical planning tool called Treat. You can plan from lateral, front or submento-vertex (SMV) views. You have access to many useful clinical and numeric planning tools designed specifically by and for surgeons, technicians and researchers. Use these tools to produce quick workups; interactive discussion with other specialists; or a detailed plan with splints for the operating room.

The Present tool uses the simulated treatment from Treat in an animated sequence of pre-/post-operation configurations in all three dimensions. This allows you to carefully study detailed treatment nuances; demonstrate your plan to the patient; or conduct case presentation to your surgical team.

Splint tool allows you to select the width, thickness and other parameters of the splint based on your treatment plans. Create an intermediate splint to position the maxilla or mandible based on your preferred order of operation. And then create a final splint. All splint data files are generated in industry standard .STL format*, for physical printing at the lab of your choice, or even on your own in-office 3D printer.
*Additional fees may apply

Step 1: Setup - Map out the general area of the main structures: Proximal segments, maxilla and mandible.

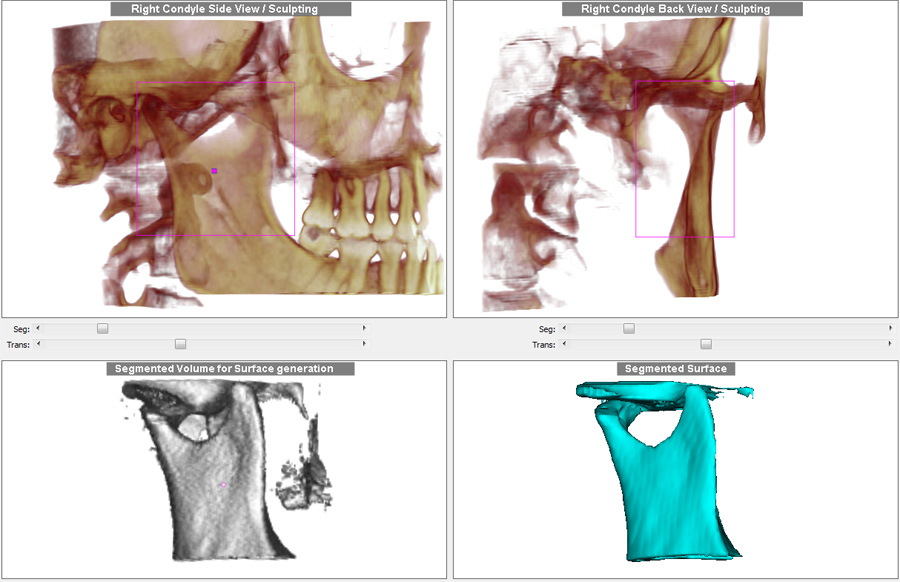
Step 2: Crop - Precisely segment the for maxilla and mandible.
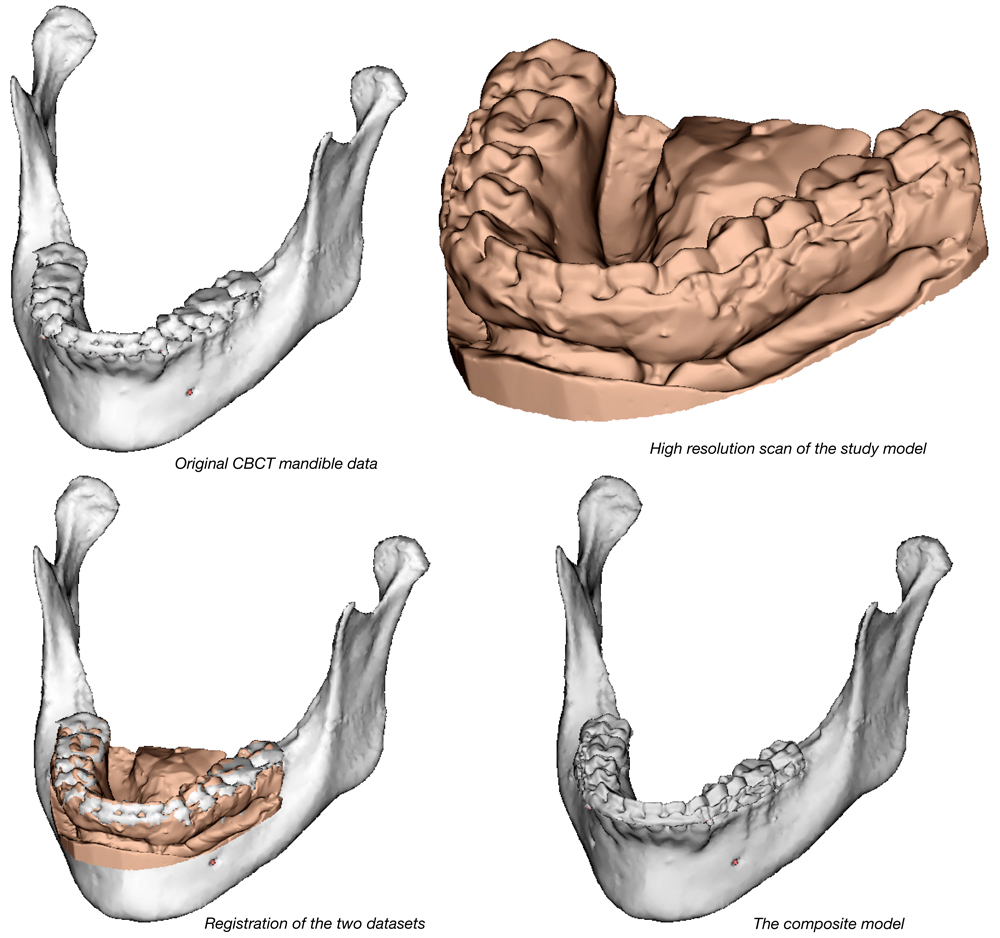
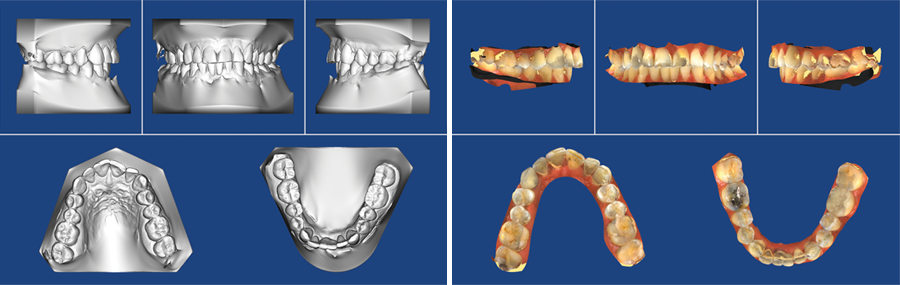
Step 3: Clean-up and merge - Sculpt away any excess tissue from around the maxilla and mandible, and replace low-resolution CBCT teeth with auto-merged high-resolution, digital study model teeth.

Step 4: Osteotomy - Perform the custom osteomy specific to the patient/case.

Step 5: Landmark – Digitize critical landmarks, including any 3D cephalometric analysis landmarks.

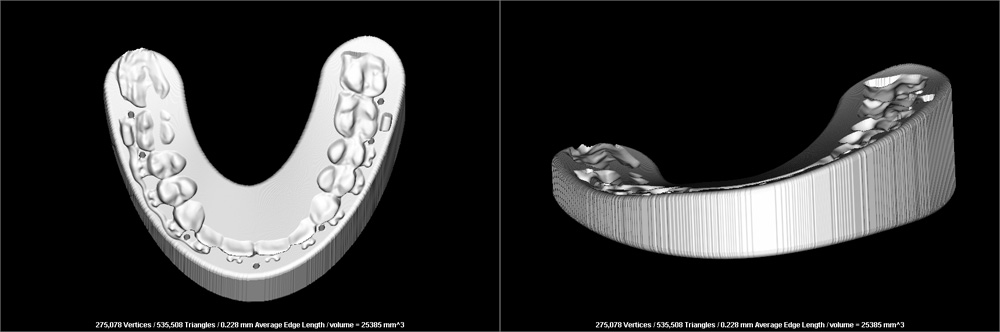
Why purchase the full arsenal of Dolphin 3D tools if the only 3D data you work with is study models? The new 3D Digital Study Model software module was designed for doctors who want to work with 3D study model data in addition to 2D patient data. What you can do:
A patient CBCT is not required to store 3D model data. Supports standard .stl and .obj file formats from existing intraoral scanners. Seamless integrations with CEREC Omnicam and CEREC Ortho Software.

3D Digital Study Models, Teeth Uncropped
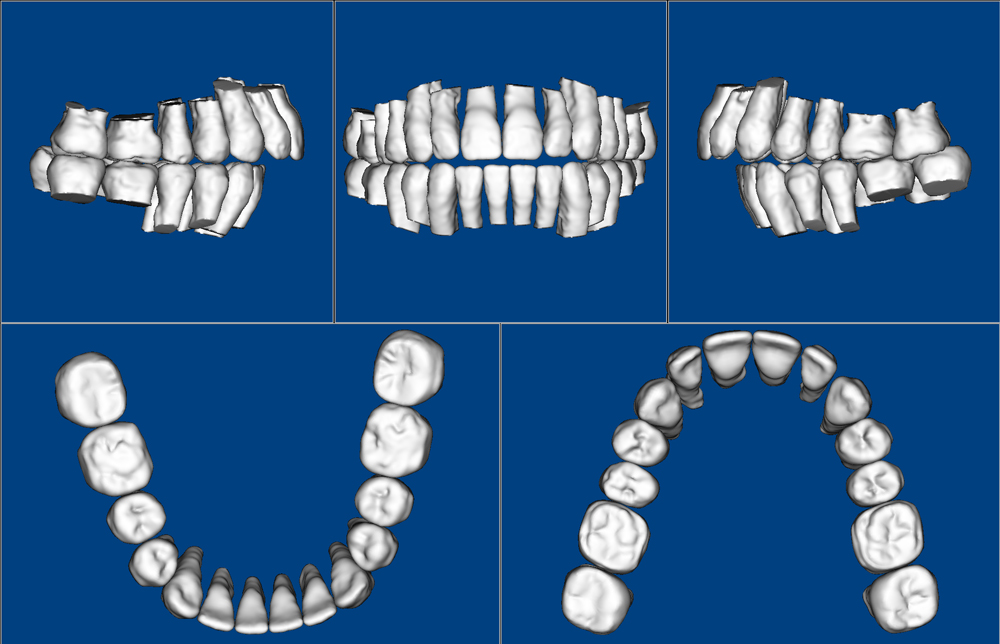
3D Study Models, Teeth Cropped

3D Study Models, 5 Up Models
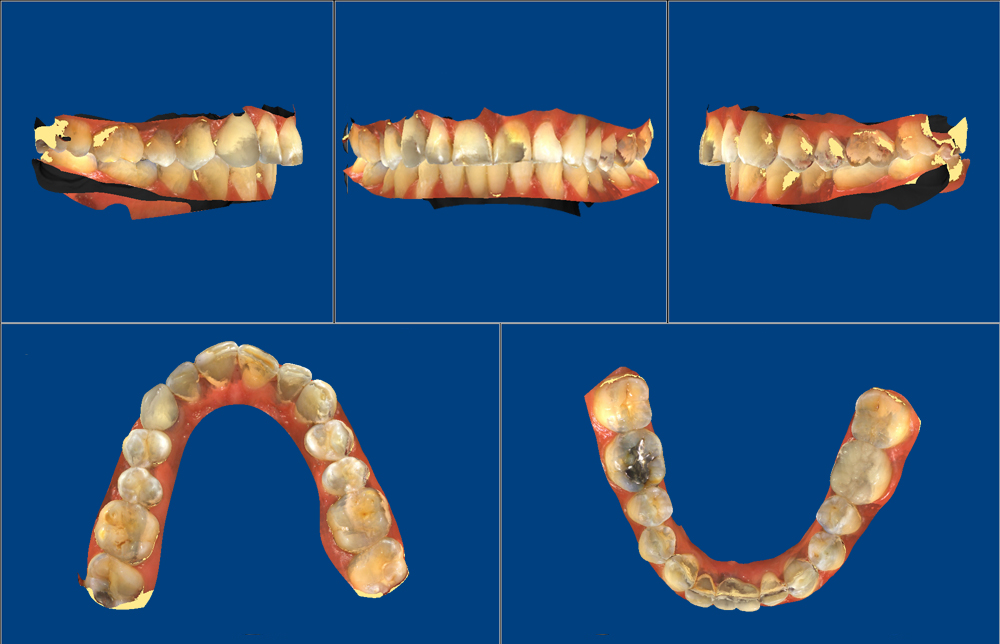
3D Study Models, 5 Up Models Colored